Showing posts with label Sandwiches. Show all posts

Mini Philly Cheesesteaks – Winning the Super Bowl Snack Table

Miniaturized sandwiches don’t usually float my boat, or submarine, as they’re almost always not as good as the full-sized versions, but these mini Philly cheesesteaks really captured everything I love about the classic.

Thinly sliced rib eye is traditionally used, and it’s fried and chopped on the grill, before meeting cheese and bread. Since we’re going to “grill” these in the oven, we’ll use a nice, juicy skirt steak instead, which has a big beefy flavor, and great marbling.

It will brown up around the edges, yet stay moist and tender because of the fat and connective tissue. I also really enjoyed the double shot of the sliced provolone and provolone “cheez whiz,” which provided a great creamy, richness. The peppers and onions brought everything together, and long story short, I ate the whole tray.

This was great hot, warm, and cold, and that alone makes it a perfect choice for your Super Bowl snack spread. Also, stay tuned for the quick and easy pickled pepper and onion relish recipe I mentioned in the clip. I hope you give these mini Philly cheesesteaks a try soon. Enjoy!


Enough for about 48 mini Philly cheesesteaks:

12 ounce skirt steak, or flap meat, or rib eye, or NY Strip
salt and freshly ground black pepper to taste
1/2 cup of pickled pepper and onion relish (stay tuned for video), OR 1/2 cup of sautéed onions and sweet peppers
*once mixed, be sure to taste and salt the final diced steak mixture!

For the “cheez whiz” sauce:
2 generous tablespoons flour
2 generous tablespoons butter
1 cup cold milk
pinch of nutmeg
pinch of cayenne
salt to taste
2 thick slices provolone cheese (about 2 to 3 ounces), torn up

48 slices of baguette
sliced or grated provolone to top the cheesesteaks

Once assembled, bake at 400 for 12 to 15 minutes, or until cheese is browned

The Cornish Pasty – Going to Fall Down a Mineshaft? This is the Meat Pie For You!

This Cornish pasty is one of those rare recipes that novice cooks will find easier to make than experienced bakers. That’s because to make this to its original, and very sturdy specifications, you’re forced to over-mix the dough…a cardinal sin that literally gives pie makers nightmares.

Like any pastry dough, we’re just adding just enough ice water to bring everything together, but unlike classic pie dough, we’re going to knead the mixture for a couple minutes past that point.  Thanks to a little thing called muscle memory, this is not going to be easy for some of you.

Get over it; because once you taste and feel the final product, it will all make sense. The tougher, but not tough dough is the perfect delivery system for the meaty filling. Speaking of which, I went with a fairly traditional version, and provided the recipe below, but this great crust will work with all sorts of stuffings.

You could use cooked meat in these, but part of what makes them so good, is how the raw ingredients cook in their own juices, while encased in the tasty dough. I can’t imagine many things that wouldn’t be great in these.

By the way, this recipe is dedicated to my mother-in-law Peggy, who requested it about five years ago. It was one of her favorite foods growing up, and I’m curious to hear how close I got. I hope you give this easy, and delicious meat pie a try soon. Enjoy!


Ingredients for 4 Cornish pasty

4 cups bread flour (mine weighed in at 1-lb 2-oz)
2 oz (4 tbsp) cold butter
3 oz (6 tbsp) cold lard
1 1/2 tsp salt
about 2/3 to 3/4 cup ice water, or enough to just bring dough together (start with about 1/2 cup, and then drizzle in more as needed)

For the steak filling:
12oz cubed beef skirt steak
1/2 cup diced onions
1 cup diced gold potatoes
1/3 cup diced turnip
1 1/2 tsp salt
1 tsp freshly ground black pepper
pinch of cayenne
2 tbsp butter, cut into 8 thin slices

For the egg wash:
1 large egg, beaten with 1 tsp water

- Bake pasties at 350 F. for about an hour or until browned and bubbly

Pastrami-Spiced Duck Breast "Reuben" – Prepare to Open Face

I first tasted pastrami-spiced, smoked duck breast about 15 years ago, and ever since I’ve wondered how it would be used in a classic Reuben sandwich. I never got around to actually trying it, but this is close, and I’m going to say, way, way better.

This was one of the more delicious and interesting duck breast preparations I’ve had in a very long time. The pastrami spices are perfect with the duck meat, and the crisp, cheesy rye was a worthy base.  The quick slaw and mustard dressing helped balance the richness, and like I said in the video, the final results were stunning.

The key here, as it is with any duck breast recipe, is to not overcooked meat. I like to go about five or six minutes on the skin side, until nice and crusty, and then turn it over and continue until the breast springs back under your touch. Obviously, the cooking times I mention in the video will depend on how large the breasts are. Mine were about 5 ounces, which I found to be the perfect size for this.

If you’re using a thermometer, you’ll want to shoot for about 135–140 internal temperature. This will give you gorgeous, pink, juicy meat, that will rival the finest steak. If you can get past the idea of eating a sandwich with a fork and knife, I really hope you give this amazing pastrami-spiced duck breast Reuben a try soon.  Enjoy!


Ingredients for two portions:
2 duck breast, boneless, skin-on (mine were 5-oz each)
For the rub:
1 tbsp olive oil or more as needed
1 tbsp ground black pepper
2 tsp ground coriander
1 tsp smoked paprika
1 tsp kosher salt
1/2 tsp dry mustard
pinch cayenne

For the Reuben:
2 slices rye bread
1/4 cup grated Swiss cheese
1 tablespoon reserved duck fat
2 cups chopped Green cabbage
2-3 tablespoons Russian or Thousand Islands dressing
2 tablespoons mustard dressing (see recipe below)

Mustard dressing:
2 tablespoons Dijon mustard
1/4 cup sherry vinegar
1/2 cup olive oil
salt and pepper to taste

Beef on Weck, Part 2: The Meat Within

As promised, this is how I do roast beef for "beef on weck." In episode one, we made the weck rolls, which are awesome, but become significantly more so when filled with freshly roasted beef and horseradish. And, don't even get me started on the au jus.

There are many cuts of beef used for this, including top round, rump roast, and brisket, but I like to use a nice thick top-sirloin roast. Instead of cooking it in the oven, I like to pan-roast this on the stovetop. There are many advantages to this approach. Since top sirloin roasts are only a couple inches thick, they cook relatively fast. They're also tender, flavorful, and because of their shape, very easy to slice thinly, which is one of the keys to this amazing sandwich.

As far as the au jus goes, it’s only going to be as good as the beef broth or stock you use, but I have a great tip regarding where to find the nice stuff. Most of your higher-end grocery store chains, which have in-house butchery departments, usually sell homemade stocks in the frozen food section.

It makes sense, since there are so many bones and meat scraps available. Not only are these products usually high-quality, they’re also pretty affordable, so check there before you use something out of a carton.

Anyway, thanks for your patience, and I really hope you try both recipes, and experience Buffalo’s best-kept, and most delicious secret. Enjoy!


Ingredients for 4 Beef on Weck sandwiches:
1 tablespoon vegetable oil
2 pound top-sirloin roast
salt and pepper to taste
2 or 3 teaspoons flour
2 1/2 cups good quality beef broth
2 tsp aged balsamic vinegar, or to taste
4 kummelweck rolls
extra hot prepared horseradish, as needed
serve with chips or fries, and pickles

Beef on Weck, Part 1: The Kummelweck Roll – You’ll Be Thirsty for More

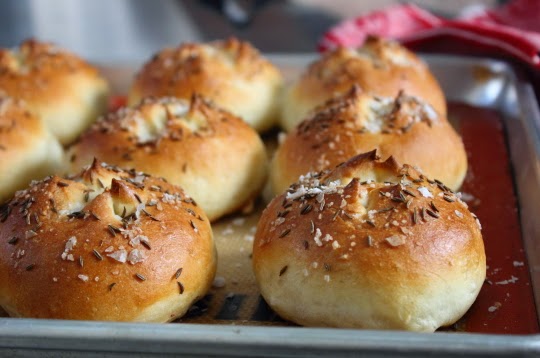
Welcome to the first of a two-part series on one of this country’s most delicious unknown sandwiches, the "Beef on Weck." This simple, but brilliant creation features thinly sliced, horseradish covered, roast beef, piled high on a freshly baked kummelweck.

The roll's fragrant caraway seeds and coarse salt are a perfect accent, and when you add a steaming ramekin of fresh beef jus for dunking, you’ll understand why this is the pride of Western New York. Sorry, chicken wings.

As legend has it, a pub owner in Buffalo, New York created the sandwich, hoping the salty rolls made by a local German baker would help increase drink sales. That sounds about right, and I do have it on very good authority that beef on weck works well with beer.

So, even if you’re not into roast beef, I still recommend you give these great sandwich rolls a try soon. And, if you are into roast beef sandwiches, I invite you to stay tuned for what I believe is America’s finest example. Enjoy!


Ingredients for 12 Kummelweck Rolls:
1 envelope active dry yeast (2 1/4 tsp)
1 cup warm water (105 F.)
2 tbsp vegetable oil
1 tbsp sugar
1 1/2 tsp salt
1 large egg white
1 generous tsp honey
*3 1/4 cups all-purpose flour total (use 1/2 cup with yeast and water to start recipe)

* I mentioned a dough tip during the video, and that has to do with not adding all the flour at once. I like to add about 80% of the flour called for, and then continue adding small amounts as the dough kneads, until I have the perfect texture.  You want a soft, fairly sticky dough that pulls off the sides of the bowl clean.

For the topping:
1 large egg white beaten with 2 tsp water
coarse grain sea salt
caraway seed

- Bake at 425 F. for 18-20 minutes

Classic Split Top Hot Dog Buns – How We Should Be Rolling

When we posted our hamburger bun video last year, I received a bunch of requests for hot dog buns. My first thought was, just take the same dough and shape it into logs instead of rounds. I mean, come on…how hard is that? Turns out, that was just the grocery store talking. I’d been so used to eating those insipid side-split rolls, it took seeing a photo of a lobster roll to remember what a real hot dog buns are supposed to be like.

Don’t get me wrong; if you hand me a hot dog at the ballgame, it’s not like I’m going to throw it back in your face (unless you have Dodger face paint on), but given the choice, this butter-crisped, split-topped bun is the way to go. Thanks to its genius design, the meat and fixings go in the top, which leave three relatively flat sides to toast in butter. How this thing never got patented is the real mystery.

Just be sure to either buy hot dogs large enough to fit your homemade buns, or adjust the size of your rolls to match your favorite wiener. I’m sorry, but people who put short hot dogs on the long buns, and then pinch off the ends of the bread, should be put in jail. Not for life, but at least 3 to 5 years.

You can also make the same number of rolls as you have hot dogs, which apparently is the kind of calculation the hot dog bun industry can’t quite master. Okay, hot dogs come 10 in a package, so let’s do the buns in packs of 8. Seriously, what’s wrong with these people? Anyway, math aside, I hope you give these old-fashioned, split top hot dog buns a try soon. Enjoy!

Please Note: As I mention, this is the exact same dough as our hamburger bun recipe. Click here to watch the official dough video


Ingredients to make 8-10 hot dog buns:
1 package (2 1/2 tsp) dry active yeast (I used Fleischmann's “RapidRise” Yeast)
1 cup warm water (105 F.)
1 large egg
3 tablespoons butter
3 tablespoons sugar
1 1/4 teaspoons salt
1 pound all-purpose flour (*about 3 1/2 cups)
*Note: add a 1/2 cup of the flour to the yeast and water, and then the remainder before kneading

Bake at 375 degrees F. for about 20 minutes, or until golden-brown

Grilled Brie & Pear Sandwich and a Great Excuse to Make One

This grilled brie and pear sandwich is dedicated to National Grilled Cheese Sandwich Day, which happens every April 12, thanks mostly to bored food bloggers, and cheese industry marketing cartels…I’m looking at you, Wisconsin. 

No matter its origins, this cheesy, savory/sweet, flavor bomb is probably my favorite non-traditional grilled cheese sandwich.

If you’re going to do this, don’t get scared and omit the pepper and thyme. This is required to tip the sweet/savory scale toward the later. Just add a tiny bit your first time, and work up from there. By the way, this grilled cheese was inspired by a cold pear and brie sandwich I had at a café many years ago, and I’ve been doing it hot ever since.

Butter is kind of a key here. It looks like a lot, but you want a seriously crispy crust to fully enjoy the soft, warm cheese and sweet pear. So, if you’re celebrating National Grilled Cheese Sandwich Day, like any normal person who spends any time on Twitter is, then I hope you consider giving this buttery beauty a try. Enjoy! 

Chicago Italian Beef “Stew Meat Edition” – The Deep Dish Pizza of Sandwiches

I’ve always wondered how stewed beef would work instead of the traditional sliced roast beef for Chicago’s famous Italian Beef Sandwich, which is kind of weird, since I’ve only had the classic version a few times, and never actually made it myself. 

I figured if you’re going to roast a hunk of beef, then slice it and put it back in the juices, why not just cook the meat in a broth to begin with? How had the fine people of Chicago not thought of this obvious adaptation? Were the same people running the Cubs also in charge of civic recipe improvements? Was Kanye West somehow to blame? And another thing; why the hell would the Bears give Jay Cutler that new contract?

Anyway, once I finished my mad experiment, I realized that this wasn’t an improvement on an old sandwich at all; it was just a new sandwich. While the flavors are similar, the texture and overall mouthfeel of this sandwich is completely different. It’s much closer to pulled pork in that respect, but delicious nevertheless.

So, while this ended up not being the Chicago Italian beef breakthrough I had hoped for, it did make for a fine lunch, and if you’re looking for a manly hand-meal for your next shindig, I hope give this tasty, and very juicy sandwich a try. Enjoy!


Ingredients for 4 large sandwiches:
1 1/2 or 2 pounds beef chuck, cut in 2-inch chunks, seasoned with salt and pepper to taste
1 tbsp vegetable oil
6 cloves garlic, sliced
1/4 tsp red pepper flakes. to taste
1 tbsp dried oregano
1 tsp dried thyme
1 tsp dried rosemary
1 tsp freshly ground black pepper
1 1/2 tsp salt or to taste
1 bay leaf
2 tbsp white vinegar
3 cups chicken broth, or enough to cover meat by an inch
4 crusty sandwich rolls
1 cup drained Giardiniera (pickled vegetables), chopped into a relish
- Brown meat and simmer covered in the remaining of ingredients until tender

The Shooter’s Sandwich – Tally Ho Indeed

Even though this trendy shooter’s sandwich has been requested many times, I’ve resisted making one because I’ve always felt there were better handheld delivery systems for steak and mushroom ingestion. Like a panini for example, or maybe even a cheesy quesadilla; but pressed into a cold, hard wedge?

Then, I had an incredibly small epiphany. I ran across the origins of the shooter’s sandwich online, and realized I might have been missing the point. This wasn’t something you make for just any lunch; it was something you make to take on a foxhunt (or what you Americans call a “tailgate party”).

I can’t remember the last time I was on a foxhunt, but after giving this a try, I can see the advantages of this very filling, very flavorful, and very sturdy sandwich. But, as I stressed in the video, you really need a couple huge steaks to make this work. Even cooked slightly pass medium, this was okay, but another half-inch of tender, pink meat would have made the whole affair significantly better.

So, I guess if I were going on a long hike, or out for a relaxing day of shooting innocent foxes, I would consider making this again, but while I tucked in, I have to admit, I’d probably be dreaming about a steaming hot, steak and mushroom hoagie. Enjoy!


Ingredients for 8 Portions:
(Note: I didn’t measure anything, ‘cause it’s a sandwich, but these should be close enough.)

For the mustard sauce:
3 tbsp Dijon mustard
1 tbsp extra hot horseradish
1 tbsp mayo

For the mushrooms:
1 tbsp olive oil
1 tbsp butter, divided
1 1/2 pound button mushrooms
salt and pepper to taste
cayenne to taste
1/2 cup minced shallots
2 tbsp brandy or sherry

The rest:
2 at least 16 to18-oz well-trimmed beef steaks (rib eye, NY strip, or top-sirloin are best choices, in that order). Seared in some vegetable oil.
salt and pepper to taste
3-4 oz fine pate, optional
1 round loaf of crusty bread

Sorta Porchetta

One of my all-time favorite street foods in San Francisco is Roli Roti’s famous porchetta sandwich, served at the Ferry Plaza Farmers Market. For those of you not familiar with the perfection that is the porchetta, it's a loin, and possibly other cuts of heavily seasoned pig parts, wrapped inside a pork belly, which is then roasted until the inside is tender, and the outside is crispy and crackling. It’s then sliced and served on a crusty roll with salsa verde.

It’s insanely good, and something I've always wanted to try doing at home. Of course, a real porchetta feeds like 20 people, so I wanted a version that would be better suited for a smaller group. 

I decided to try using a small pork shoulder roast. The plan was to mimic the same flavors, but cook it more like pork loin, instead of the usual fork tender, falling apart state we associate with this cut. Pulled pork was not what I was after here.

It worked wonderfully, although you do need to slice it nice and thin. We’re only cooking this to 145 F. which is not high enough a temperature to break down all that connective tissue. All in all, I thought it was a very successful experiment, especially when you consider how much we scaled this down. 

What it didn’t feature however, was that crispy skin, also known as “the best part.” I wish I’d thought of it before I finished the video, but what I should have done was fried up some diced pancetta (un-smoked Italian bacon) until it was perfectly crispy, and topped the sandwich with that! That would have put this already fine faux-porchetta over the top! I hope you give this a try soon. Enjoy!


Ingredients for 4 very large portions:
2 1/2 pound boneless pork shoulder roast, butterflied open, and slashes made all over the connective tissues
olive oil as needed
1 tbsp kosher salt (2 tsp for inside, and 1 for out)
1 tbsp black pepper
2 tbsp chopped sage leaves
2 tbsp chopped rosemary
6 cloves minced garlic
zest from a large orange
2 tsp fennel seeds, crushed
- Stuff, tie, salt, and refrigerate uncovered for 24 hours
- Roast at 450 F. for 15 minutes
- Reduce heat to 250 F. and roast another hour, or until an internal temp of 145 F.

For the vinegar sauce:
1/2 anchovy fillet
1 tsp hot chili flakes or to taste
1/4 cup white wine vinegar
1/4 cup freshly chopped Italian parsley

Bonus How to Butterfly Meat for Rolling Video! 


Warm Goat Cheese & Peach Tartine – Open Face, Insert Summer

I usually don’t mention the time of year during these videos, since I have no way of knowing when someone will actually view them, but when it came to this goat cheese and peach tartine, I couldn’t help myself. For me, this is summer on a slice of bread. My apologies to those of you reading/watching this in February.

August is national goat cheese month (no, I don’t know who decides these things), and what better way to enjoy chèvre than by topping it with sweet, ripe, impossibly juicy peach slices? Mix in a little thyme and black pepper to keep things interesting, and you’re looking at a very special treat. Just make sure to use stale bread.

As I bemoaned in the clip, I used a fresh loaf, which while perfectly delicious, wasn’t perfect. Staler bread would have produced a crunchier stage for our co-stars, as there’s more then enough moisture provided by the cheese and fruit.

By the way, if you don’t have any day-old bread, but still want to enjoy this post haste, simply toss the toasted, olive-oiled slices into a 350 F. oven for a few minutes, to dry out and crisp up before you top with the cheese. Either way, you're in for a significantly tasty summer treat. I hope you give this a try soon (while it’s still summer!). Enjoy!


Ingredients for each Warm Goat Cheese & Peach Tartine:
1 thick slice French bread, sourdough or not
1 tbsp olive oil, or as needed
2 oz fresh goat cheese
3 slices fresh peach
fresh thyme leaves and freshly ground black pepper to taste
salt to taste

Homemade Hamburger Buns – Oh, My, God. Becky, Look at Her Bun!

Finding high-quality hamburger meat at the market is a lot easier than it used to be, but the same cannot be said for the buns. They’re never the right dimensions for a decent sized patty; and they’re either made from some insipid white sponge with seventy-three ingredients, or from high-fiber, whole grains, which in many ways is even worse.

A proper bun should be nothing more than a light, buttery, airy delivery system for getting a hot, juicy hamburger into your mouth. Oats, spelt, and flax seeds have no business getting anywhere near this type of operation. That's what turkey sandwiches are for.

Above and beyond taste and texture, the bun needs to be the right diameter to fit a classic half-pound burger, and should be twice as thick as the patty. I guess you could drive all over town looking for these magic buns, but it would be a lot easier just to make them yourself.

They do take few hours, but most of that is rise time, and when you see and taste the results, I’m sure you’ll agree it was well worth the investment. By the way, don’t worry if your buns are slightly irregular in size. We’ll assume you’ll form your burgers with the same precision, so in the end they should match perfectly. I hope you give these a try soon. Enjoy! 

Editorial Note: Today’s title will only make sense if you watch the video, and are familiar with Sir Mix-A-Lot’s "Baby Got Back."


Ingredients for 8 large hamburger buns:
1 package (2 1/2 tsp) dry active yeast (I used Fleischmann's “RapidRise” Yeast)
1 cup very warm water
1 large egg
3 tablespoons butter
3 tablespoons sugar
1 1/4 teaspoons salt
1 pound all-purpose flour (about 3 1/2 cups)
Note: add a 1/2 cup of the flour to the yeast and water, and then the remainder before kneading
 
for the tops:
1 egg beaten with 1 tbsp milk
sesame seeds
*bake at 375 degrees F. for 15-17 minutes

View the complete recipe

You Can Count on Monte Cristo Benedict for Mother’s Day Brunch

I always get a ton of food wishes this time of year for creative brunch ideas, and I was thinking about doing some new type of eggs Benedict, when I happened to see a photo of a Monte Cristo sandwich. At first, it just made me want a Monte Cristo sandwich, but after that wore off, I started thinking about how I’d seen these topped with fried eggs before.

Long story short, I decided to simply make an open-faced version of the famous stuffed sandwich, and top it with poached eggs, and hopefully a new American brunch classic was born. Of course, I'll let you decide, but there was nothing I didn’t love about this plate of food. Okay, the salad was kind of phoned in, but the rest was awesome.

The base is a variation of our famous Restaurant Style French Toast recipe, which marries perfectly with the ham, cheddar and havarti. It was so tasty you really don’t even need the poached eggs. Actually, forget I said that. Do the eggs. If only so you can pop those yolks, and watch them run. Besides the eating, that has to be the best part.

I’ve also re-posted a poached eggs demo below, since poaching your eggs ahead of time is the only way to go, especially if you have a larger group. By the way, you can hold the Monte Cristo bases in a warm oven while you pull the rest of the meal together. I hope you give this new Benedict a try soon. Enjoy!


Ingredients for 4 portions:
For the batter:
2 large eggs
1/4 cup cream
1 tbsp sugar
pinch of salt
pinch of cayenne
1/4 tsp cinnamon
1/8 tsp allspice
4 thick slices of French bread
1 tbsp butter
8 slices ham
4 slices cheddar cheese
4 slices havarti cheese
chive to garnish

How to Poach Eggs 
 

View the complete Poached Eggs recipe

View the complete Monte Cristo Benedict recipe

Pita Bread – What’s in Your Pocket?

There are many baked products that you could make at home, but because of time, effort, and quality issues, probably shouldn’t. Fortunately, pita bread is not on that list. The dough is easy to make, and much like the flour tortillas we did, the taste and texture of the freshly made product is far superior to anything that comes with a twist tie.

The method is very straightforward, but I wanted to take a moment to talk about production. As you’ll see in the clip, after you roll the pita dough out, you’ll need to let it rest for 5 minutes before grilling. Since each one takes about 5-6 minutes in the pan, while one is cooking, you’ll want to roll the next, so it’s rested and ready to puff.

Speaking of “puff,” don’t be too upset if yours don’t go full balloon. Sometimes they all puff, sometimes some, and sometimes none. This is the way of the pita. But the good news is, even if they don’t fully puff, you should still get some sort of internal pocket with which to stuff. Even if you don’t, it’s okay…you’ll just call them “flatbread” instead! I hope you give these a try soon. Enjoy!


Ingredients for 8 pita breads:
For the sponge mix:
1 pkg dry active yeast (2 1/4 tsp)
1 cup warm water (about 90-100 degrees F.)
1 cup (4.5 oz by weight) all-purpose flour
Then:
1 1/2 tablespoons olive oil
1 3/4 teaspoons salt
1 3/4 to 2 cups all-purpose flour, or until a soft, slightly sticky dough forms (about 8-9 oz by weight)
*Let rise about 2 hours, or until doubled in size. Form 8 small, round loaves, let rise 30 minutes. Roll out and let rest 5 minutes before grilling.

View the complete recipe

National Grilled Cheese Sandwich Day!

I heard that Friday is National Grilled Cheese Sandwich Day, and what better way to commemorate than by making this epic version of America's favorite sandwich? Hopefully most of you have seen and made this before, but just in case, here you go. Enjoy!